
Publishing an npm Package: files, exports, Types and Tokenless Releases
npm publish is one command, and it will happily upload your .env, skip your type declarations, or ship an entry point that Node can't resolve. The mistakes that bite are in what goes into the tarball and in a handful of package.json fields, not in the publish step. Then there's the question of how to publish from CI in 2026 without an npm token sitting in your secrets.
This walks through a small real package, @acme/tiny-slug, from package.json to a staged, approved release. The commands were run with Node 24.4.0 and npm 11.4.2 locally; where npm 12 (12.2.2 is current as of November 2026) behaves differently, it's called out.
Decide what goes in the tarball
By default npm includes everything that isn't ignored. The files field flips that to an allowlist, and npm always adds package.json, the README, the licence file, and whatever main and bin point to. Lock files, .git, .npmrc and node_modules are always left out, whatever you write. An allowlist is safer than .npmignore, because a new file in the repo stays out until you decide otherwise.
Here's the package:
{
  "name": "@acme/tiny-slug",
  "version": "1.0.0",
  "type": "module",
  "exports": {
    ".": {
      "types": "./dist/index.d.ts",
      "default": "./dist/index.js"
    },
    "./package.json": "./package.json"
  },
  "files": ["dist"],
  "engines": { "node": ">=20.19" },
  "license": "MIT"
}
The project folder also had src/index.ts and a .env. npm pack --dry-run shows exactly what would be uploaded without uploading it:
npm notice 📦  @acme/[email protected]
npm notice Tarball Contents
npm notice 12B README.md
npm notice 52B dist/index.d.ts
npm notice 112B dist/index.js
npm notice 27B dist/internal.js
npm notice 299B package.json
npm notice Tarball Details
npm notice name: @acme/tiny-slug
npm notice version: 1.0.0
npm notice filename: acme-tiny-slug-1.0.0.tgz
npm notice package size: 491 B
npm notice unpacked size: 502 B
...
npm notice total files: 5
No src/, no .env. Make npm pack --dry-run a habit before every first publish and after any build change. A published version can't be overwritten: npm publish fails if the name and version already exist, and the unpublish policy says a used package@version can never be reused.
The exports map is your public API
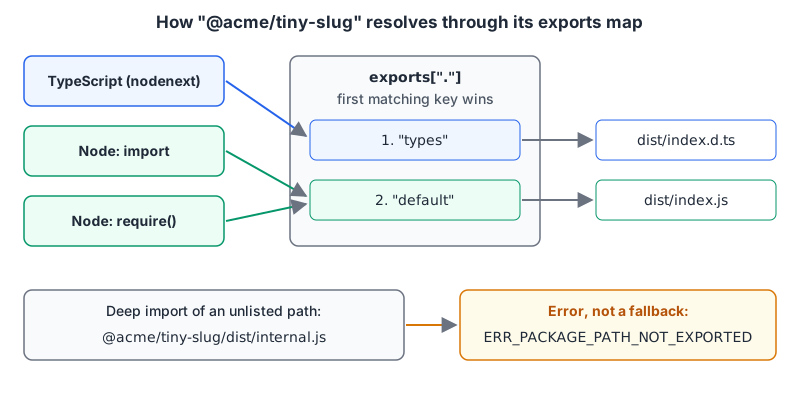
exports tells Node which files can be imported and under what conditions. Node's packages documentation (v26.13.0) spells out three rules worth memorising:
- When both are present,
exportstakes precedence overmain. - Every path not listed is sealed off. Importing one throws
ERR_PACKAGE_PATH_NOT_EXPORTED, and the docs warn that addingexportsto an existing package "will likely be a breaking change." Treat it as a major version. - Conditions are tried in object order and the first match wins.
"default"should always come last, and the community"types"condition should always come first.
The seal is easy to see. With the package installed, an import of the root works and a deep import doesn't:
$ node a.mjs        # import { slugify } from "@acme/tiny-slug"
hello-world

$ node b.mjs        # import "@acme/tiny-slug/dist/internal.js"
Error [ERR_PACKAGE_PATH_NOT_EXPORTED]: Package subpath './dist/internal.js' is not defined by "exports" in .../node_modules/@acme/tiny-slug/package.json
That's the point: dist/internal.js is now an implementation detail you can rename in a patch release. The "./package.json" entry is there because, as the Node docs point out, exports also blocks require('your-package/package.json') unless you list it, and some tools read it.
ESM only, or dual?
For years the safe answer was to ship both an ES module and a CommonJS build, because CommonJS code couldn't require() an ES module. That changed. Node's modules docs say require() of ES modules is enabled by default from Node 22.12.0 and 20.19.0, and stopped being experimental in v25.4.0. The one condition is that the module graph has no top-level await; if it does, require() throws ERR_REQUIRE_ASYNC_MODULE.
The ESM-only package above, loaded from a .cjs file on Node 24:
$ node c.cjs        # const m = require("@acme/tiny-slug")
from-commonjs
So for a new package, I'd ship ESM only and say so in engines (>=20.19 here, which is a hint npm only enforces with engine-strict). Go dual only if you need to support older Node lines or tools that can't load ESM. If you do, the TypeScript modules reference shows the shape, with a declaration file per format:
{
  "exports": {
    ".": {
      "import": {
        "types": "./dist/index.d.mts",
        "default": "./dist/index.mjs"
      },
      "require": {
        "types": "./dist/index.d.cts",
        "default": "./dist/index.cjs"
      }
    }
  }
}
The .d.mts and .d.cts extensions matter: TypeScript treats .d.mts as an ES module and .d.cts as CommonJS, so a single .d.ts shared by both builds can only describe one of them correctly. That mismatch is what attw (below) reports as "Masquerading as CJS" or "Masquerading as ESM".
Make sure TypeScript finds your types
TypeScript reads exports only under moduleResolution set to node16, nodenext or bundler. The TypeScript reference says it always matches the "types" and "default" conditions there. The old node10 mode doesn't support exports at all, and falls back to the top-level "types", "typings" and "main" fields. Two practical consequences:
- Put
"types"first inside each condition block, as above, so it's matched before"default". - Add a top-level
"types"field anyway. The TypeScript docs point out that npm only shows the TS badge on a package listing when that field is present, and it helps consumers still onnode10resolution.
Check the package before you publish it
Two linters catch most of what reviewers miss:
- publint (0.3.25 on npm) checks a package for compatibility issues across Node and bundlers like Vite, webpack and Rollup. Run
npx publintafter your build step. - Are the types wrong? (
@arethetypeswrong/cli, 0.18.5) packs your package and resolves it the way TypeScript would undernode10,node16andbundler, flagging problems like "Masquerading as CJS" or missing types.npx attw --pack .runs it;--profile esm-onlyignores CommonJS failures for an ESM-only package like ours. Its README notes--packonly works with npm.
Put both in a prepublishOnly script. Per the npm scripts docs, prepublishOnly runs only on npm publish, before the package is packed.
Versions, tags and access
Bump with npm version patch|minor|major, which commits and tags (v1.1.0) in a Git repo. Choosing the bump is the semver question: anything that changes exports or removes an export is major. Write the changelog entry before you tag; our changelog generator turns Conventional Commit subjects into a Keep a Changelog section.
Every publish moves a dist-tag, and the tag config defaults to latest, which is what a bare npm install @acme/tiny-slug gets. Publish release candidates under another tag so nobody gets one by accident:
npm version premajor --preid rc     # 2.0.0-rc.0
npm publish --tag next
Scoped packages are public by default for new packages per the same config docs; pass --access restricted to keep a scoped package private (unscoped packages can't be restricted).
Publishing from CI without a token
npm revoked all classic tokens on 9 December 2025, and the shape it now recommends is trusted publishing plus staged publishing. Our npm supply-chain post covers why. Here's the setup, from npm's own docs.
Trusted publishing swaps the long-lived token for a short-lived OIDC credential minted by the CI job. It needs npm CLI 11.5.1+ and Node 22.14.0+, works with GitHub Actions, GitLab CI/CD and CircleCI, and only on cloud-hosted runners. You configure it in the package's settings on npmjs.com. For public packages built from public repos on GitHub Actions or GitLab, npm attaches a provenance attestation automatically. Provenance requires the repository field in package.json to match the source repo, case-sensitively, and npm is explicit that it doesn't prove the code is free of malware, only where it was built.
Staged publishing adds a human. npm stage publish uploads the version in a state nobody can install, and a maintainer releases it with npm stage approve <stage-id>, which prompts for 2FA. GitHub made it generally available in May 2026 for npm 11.15.0 or newer. The npm docs say short-lived OIDC tokens can only run npm stage publish and npm publish, never approve, and npm trust can restrict a trust relationship to staging only. That's the setup I'd use: CI can stage, only a person can release.
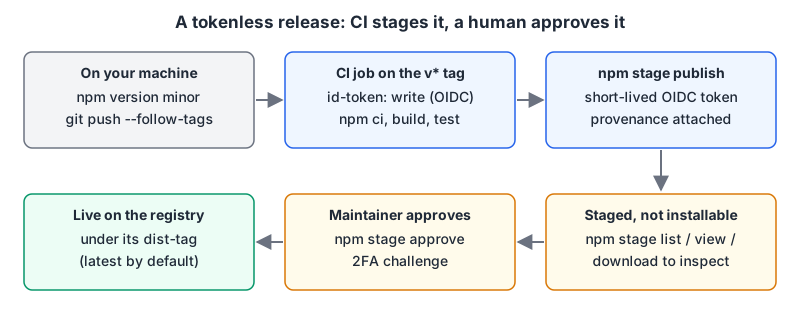
The workflow, triggered by the tag that npm version created and pushed with git push --follow-tags:
name: Release
on:
  push:
    tags: ['v*']
permissions:
  contents: read
  id-token: write          # lets the job mint the OIDC token
jobs:
  stage:
    runs-on: ubuntu-latest   # cloud-hosted runner required
    steps:
      - uses: actions/checkout@<full-commit-sha>
      - uses: actions/setup-node@<full-commit-sha>
        with:
          node-version: 24
          registry-url: https://registry.npmjs.org
      - run: npm --version     # needs 11.15.0+ for npm stage
      - run: npm ci
      - run: npm run build
      - run: npm test
      - run: npm stage publish
Check that npm --version line before trusting the bundled npm. Node's release index shows Node 24.22.2 (27 October 2026) ships npm 11.19.1, which is new enough, but Node 22.23.4 ships npm 10.9.9 and the Node 24.4.0 used for this post came with 11.4.2, both too old. If you upgrade npm in the job instead, note that npm 12 requires Node ^22.22.2, ^24.15.0 or >=26.0.0. Pin your actions to commit SHAs; our GitHub Actions patterns post explains why.
Once a trusted publish has worked, npm recommends switching the package's publishing access to "Require two-factor authentication and disallow tokens".
Pre-publish checklist
filesis an allowlist andnpm pack --dry-runshows only what you meant.exportslists every public entry point,"types"first and"default"last, plus"./package.json".- Top-level
"types"is set, andattw --pack .andpublintare clean. engines.nodematches the oldest Node you test on; for ESM-only that's 20.19 or newer.repositorymatches the GitHub or GitLab repo exactly, or provenance fails.- Prereleases go out with
--tag next. - CI publishes with trusted publishing via
npm stage publish, and a maintainer approves. - Publishing access is set to require 2FA and disallow tokens.
If you publish with pnpm, Yarn or Bun instead, our package manager guide covers how they differ from npm, including their security defaults and workspace support.
Written by AIDToolStack Editorial
Researched from official documentation, specifications and vendor pages, listed under Sources below. Last checked November 2026.
Sources
- docs.npmjs.com/cli/v12/configuring-npm/package-json
- docs.npmjs.com/cli/v12/commands/npm-publish
- docs.npmjs.com/cli/v12/using-npm/config
- docs.npmjs.com/cli/v11/using-npm/scripts
- docs.npmjs.com/policies/unpublish
- nodejs.org/api/packages.html
- nodejs.org/api/modules.html
- nodejs.org/dist/index.json
- www.typescriptlang.org/docs/handbook/modules/reference.html
- publint.dev/docs/
- github.com/arethetypeswrong/arethetypeswrong.github.io/blob/main/packages/cli/README.md
- docs.npmjs.com/trusted-publishers
- docs.npmjs.com/generating-provenance-statements
- docs.npmjs.com/cli/v12/commands/npm-stage
- github.blog/changelog/2026-05-29-staged-publishing-and-new-install-time-controls-for-npm/
- github.blog/changelog/2025-12-09-npm-classic-tokens-revoked-session-based-auth-and-cli-token-management-now-available/
- github.com/npm/cli/releases/tag/v12.0.0
- git-scm.com/docs/git-push
Related Posts
Explore on AIDToolStack
Discover tools and servers featured in our directory.
AI Tools
MCP Servers
Sponsor Our Newsletter
Reach thousands of developers who are actively evaluating AI tools, MCP servers, and dev infrastructure. Our weekly newsletter goes to engaged technical decision-makers.
All sponsored content is clearly labeled per our editorial policy.