
Tailscale for Developers: Tailnets, Tailscale SSH, Serve, Funnel and Grants
Here's a setup a lot of developers drift into. A VPS runs staging and a Postgres instance. Port 22 is open to the world because you SSH in from home, the office and the occasional hotel. Postgres listens only on localhost, so every time you want to look at data you open an SSH tunnel first, and every time you forget, you wonder why the GUI client hangs. A Raspberry Pi at home runs a few services you can't reach at all when you're out.
Tailscale replaces most of that with a private network across your own devices. Nothing gets a public port, every device gets a stable name, and access is decided by one policy file. This post covers how it works, Tailscale SSH, Serve and Funnel for sharing local services, grants for access control, and what the free plan includes as of November 2026. The current client release is v1.104.5, from 3 November 2026.
What a tailnet is
Tailscale's own description: it uses WireGuard for encrypted point-to-point connections between devices, forming a peer-to-peer mesh called a tailnet. Devices connect across NAT and firewalls without port forwarding. There's no central gateway that all traffic squeezes through, which is the main difference from a traditional VPN, though you can still route everything through an exit node if you want that.
There are two planes to keep apart in your head:
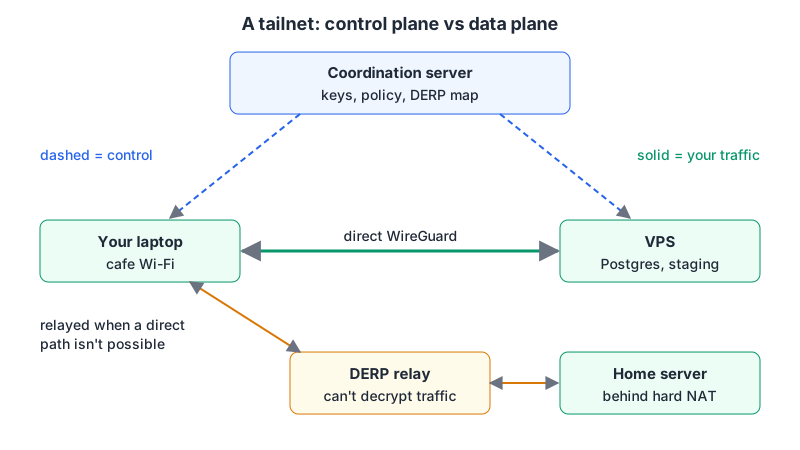
- The coordination server (control plane) hands out keys, your access policy and the map of relay servers.
- Your traffic (data plane) goes device to device. When a direct connection isn't possible, for example behind hard NAT, it first tries peer relays and then falls back to DERP relay servers. DERP traffic is still WireGuard-encrypted; the docs say it's impossible for a DERP server to decrypt it.
The same page notes that if the coordination server is unavailable, clients keep their last known relay list, so existing connections can keep working.
Getting two machines talking
On Linux, the install is a script plus one command:
curl -fsSL https://tailscale.com/install.sh | sh
sudo tailscale up
tailscale up prints a URL; open it, sign in, and the machine joins your tailnet. Do the same on your laptop with the desktop app. Now the VPS can drop its public SSH rule entirely, and Postgres can listen on the Tailscale interface rather than localhost, so your GUI client connects directly.
That second step deserves care: bind the database to the Tailscale address, not 0.0.0.0, and keep the cloud firewall closed. The tailnet is the only way in.
Tailscale SSH: no keys to copy around
Tailscale SSH lets the tailnet itself authenticate SSH connections. From the docs, you enable it on the destination host:
sudo tailscale set --sshThat generates a host key pair and tells tailscaled to intercept tailnet traffic on port 22. The connection is authenticated and encrypted over WireGuard using Tailscale node keys, and the SSH client doesn't supply any further proof. Who gets in, and as which Unix user, is decided by the ssh section of your tailnet policy:
"ssh": [
  {
    "action": "check",
    "src": ["group:engineering"],
    "dst": ["tag:server"],
    "users": ["ubuntu"],
    "checkPeriod": "12h"
  }
]
accept lets an authenticated tailnet user straight in. check makes them re-authenticate periodically; the default period is 12 hours, and checkPeriod can range from one minute to 168 hours, or always for every connection. For production boxes, check is the sensible default.
Some details that matter in practice:
- Tailscale only claims port 22 on the Tailscale IP address. Your normal
sshd,sshd_configandauthorized_keysaren't touched, so you keep a fallback path. - The port can't be changed.
- Servers must be Linux, or macOS running the open-source
tailscale+tailscaledCLI build. Synology and QNAP aren't supported.
You'll still want ordinary SSH keys for machines outside your tailnet and for Git hosting. Our SSH keys and commit signing post covers Ed25519 and FIDO2 keys, and the SSH key generator is there for quick throwaway pairs.
Serve and Funnel: sharing a local port
Both commands take a local port and put it behind an HTTPS URL. The difference is who can reach it.
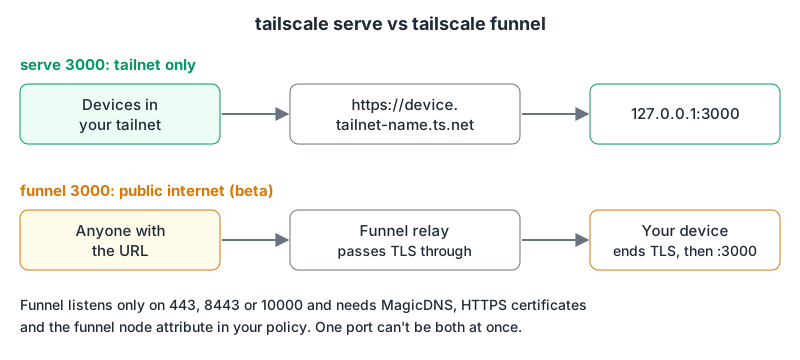
Serve is tailnet-only:
tailscale serve 3000          # https://<device>.<tailnet>.ts.net -> 127.0.0.1:3000
tailscale serve status
tailscale serve reset
It needs HTTPS certificates enabled for your tailnet (the CLI walks you through consent if they aren't), and your access policy still applies. A nice touch: proxied requests carry identity headers such as Tailscale-User-Login, so an internal tool can know who's calling without its own login. Tagged devices don't get those headers.
Funnel makes the same thing public:
tailscale funnel 3000Funnel is still marked beta, and it's available on all plans. Requirements and limits from the docs:
- MagicDNS and HTTPS certificates enabled, Tailscale v1.38.3 or later, and the
funnelnode attribute in your policy (by default the CLI grants it toautogroup:member). - Only ports 443, 8443 and 10000.
- Only your
tailnet-name.ts.netdomain, no custom domains. - Bandwidth limits you can't configure.
- TLS is terminated on your device; the relay forwards encrypted traffic without decrypting it.
- New public DNS records can take up to 10 minutes, and requesting certificates too often can hit Let's Encrypt rate limits that block retries for up to 34 hours. Don't script a loop that toggles Funnel.
- A port can't be served and funnelled at the same time; the latest command wins.
Funnel is fine for a quick public demo or a webhook receiver. If you need your own domain, steady traffic or an auth layer in front, a Cloudflare Tunnel with an Access policy in front is the better tool (the Cloudflare MCP server page covers the agent side of managing one).
Access control: grants
The tailnet policy file decides who can reach what. Tailscale now has two syntaxes for it. Grants are the newer one: they can do everything the legacy ACLs can, plus application-level permissions and route filtering. Both can live in the same policy file, and Tailscale recommends favouring grants.
A grant has a src, a dst and at least one permission: ip for network access or app for application capabilities. A small policy for the setup at the top of this post might look like this:
{
  "groups": {
    "group:engineering": ["[email protected]", "[email protected]"]
  },
  "tagOwners": {
    "tag:server": ["group:engineering"]
  },
  "grants": [
    {
      "src": ["group:engineering"],
      "dst": ["tag:server"],
      "ip": ["tcp:5432", "tcp:443"]
    }
  ],
  "ssh": [
    {
      "action": "check",
      "src": ["group:engineering"],
      "dst": ["tag:server"],
      "users": ["ubuntu"]
    }
  ]
}
Everything not granted is denied, so this lets engineers reach Postgres and HTTPS on tagged servers and SSH in as ubuntu with periodic re-auth, and nothing else. Tag your servers rather than granting access to individual machines; when a box is rebuilt it gets the same tag and the same rules. The policy syntax reference documents each section.
If you'd rather have an AI agent inspect devices or policy for you, our page on the community Tailscale MCP server lists what it can do. Keep its API key scoped the way you'd scope a human.
What the free plan covers
From the pricing page as of November 2026:
| Plan | Price | Users | Notable limits |
|---|---|---|---|
| Personal | Free | Up to 6 | Unlimited user devices, 3 ACL groups, 50 tagged resources (then $1/month each), non-commercial use |
| Standard | $8/user/month | Unlimited | 10 ACL groups, SCIM, device posture integrations |
| Premium | $18/user/month | Unlimited | 300 ACL groups, just-in-time access, advanced Tailscale SSH, network flow logs |
The non-commercial restriction is the one to read twice: Personal is for your own projects and homelab, not for a company's staging servers. Older plan names (Personal Plus, Starter) are now listed as legacy.
Where Tailscale fits
- Use it for reaching your own machines: SSH, databases, admin panels, a home server, CI runners that need to hit staging. It removes public ports rather than guarding them.
- Use Serve to share an internal tool with teammates who are already in the tailnet.
- Use Funnel sparingly for short-lived public demos on the
ts.netdomain. - Look elsewhere when the audience is the public internet long term, or when you need a cloud development environment rather than access to your own; remote development environments compares those.
A good first afternoon: install it on your laptop and one server, enable Tailscale SSH with check, confirm you can get in, then close port 22 in your cloud firewall. Keep a provider console login handy as the break-glass path.
Written by AIDToolStack Editorial
Researched from official documentation, specifications and vendor pages, listed under Sources below. Last checked November 2026.
Sources
- github.com/tailscale/tailscale/releases
- tailscale.com/kb/1151/what-is-tailscale
- tailscale.com/kb/1232/derp-servers
- tailscale.com/kb/1031/install-linux
- tailscale.com/kb/1193/tailscale-ssh
- tailscale.com/kb/1312/serve
- tailscale.com/kb/1223/funnel
- tailscale.com/kb/1324/grants
- tailscale.com/kb/1337/policy-syntax
- tailscale.com/pricing
Related Posts
Explore on AIDToolStack
Discover tools and servers featured in our directory.
AI Tools
MCP Servers
Sponsor Our Newsletter
Reach thousands of developers who are actively evaluating AI tools, MCP servers, and dev infrastructure. Our weekly newsletter goes to engaged technical decision-makers.
All sponsored content is clearly labeled per our editorial policy.