
CSS Nesting and Cascade Layers: What Changes When You Leave Sass
If you still run Sass mostly for nesting, and fight specificity with ever-longer selectors and the odd !important, two plain-CSS features now cover both jobs. Native nesting has been Baseline since December 2023, and cascade layers since March 2022. The trouble is that nesting looks like Sass and behaves differently in a few places that matter, and layers flip some cascade rules you've relied on for years. This is the migration guide I wish I'd had: what changes, what breaks, and the order to do it in.
Nesting: the rules that matter
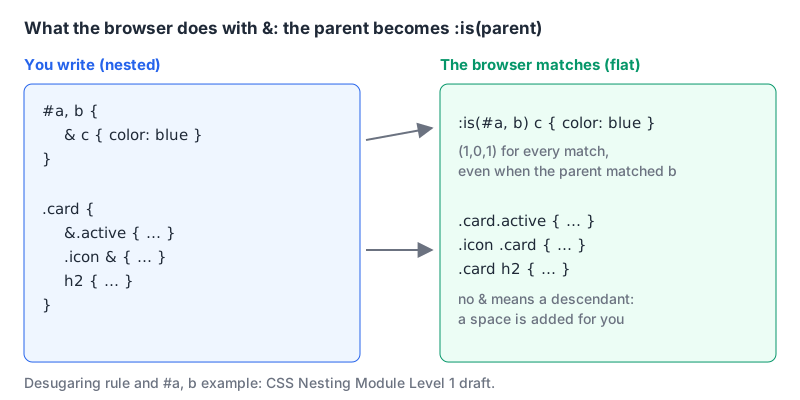
The CSS Nesting draft defines & by desugaring: it's replaced with the parent rule's selector "wrapped in an :is() selector". Everything else follows from that.
.card {
  padding: 1rem;

  h2 { margin-top: 0; }            /* .card h2       (descendant, & optional) */
  &.is-active { outline: 2px solid; } /* .card.is-active (compound, & required) */
  &:hover { background: #f9fafb; }  /* .card:hover */
  .sidebar & { padding: 0.5rem; }   /* .sidebar .card (reversed context) */

  @media (width >= 40em) {
    padding: 2rem;                  /* nested at-rules work too */
  }
}
MDN's guide to using nesting puts the key rule plainly: without &, the browser adds whitespace for you, so .b inside .a means .a .b. For a compound selector you have to write &.b.
One historical note if you support older browsers: MDN's compat data marks Chrome 112 to 119 and Safari 16.5 to 17.1 as partial, because they didn't accept nested rules starting with a type selector. Full support is Chrome 120, Firefox 117 and Safari 17.2. If your analytics still show those versions, write & h2 instead of h2 and it works in both.
Where native nesting differs from Sass
| Pattern | Sass | Native CSS |
|---|---|---|
&__title inside .card | compiles to .card__title | invalid; the nested rule is dropped |
#a, b { & c {} } | two selectors, #a c (1,0,1) and b c (0,0,2) | one selector, :is(#a, b) c, (1,0,1) for both |
| Declarations after a nested rule | in written order since Dart Sass 1.92.0 | in written order (with CSSNestedDeclarations) |
| Runs where | at build time | in the browser |
No string concatenation. This is the one that breaks BEM codebases. Sass lets you add suffixes like &__copy and &--open. The nesting spec explains why CSS can't: nesting "is not a syntax transformation, but rather matches on the actual elements the parent selector matches," and &Bar would be a type selector in the wrong position anyway. I checked .card6 { &__title { color: red } } in Chrome 152: the nested rule is discarded and .card6__title stays unstyled. No error, no warning.
Specificity flattens upward. The spec's own example:
#a, b {
  & c { color: blue; }
}
.foo c { color: red; }
On <b class="foo"><c>, the text is blue. The & takes the specificity of #a, the heaviest item in the parent list, so & c is (1,0,1) and beats .foo c at (0,1,1). Sass nests each item of a list separately, so it would have emitted #a c, b c; the <b> match scores (0,0,2) there, and red would win. Chrome 152 rendered it blue, as the spec says. If you nest under selector lists that mix IDs and types, expect some overrides to stop working after the switch.
Declaration order. Older browsers hoisted declarations that came after a nested rule. MDN notes that support for keeping them in order arrived with the CSSNestedDeclarations interface, which the compat data lists for Chrome 130, Firefox 132 and Safari 18.2. Dart Sass made the same change the default in 1.92.0. In Chrome 152, this ended up green, the last declaration:
.t9 {
  color: blue;
  @media (min-width: 1px) { color: red; }
  color: green;
}
The practical advice: put a rule's own declarations first and nested rules after them. Then it doesn't matter which behaviour a browser has.
Cascade layers: order beats specificity
Layers let you decide up front which group of styles wins, regardless of how specific the selectors inside are. From MDN's @layer reference: "once the layer order has been established, specificity and order of appearance are ignored."
/* 1. Declare the order once, first thing in your CSS */
@layer reset, vendor, components, utilities;

/* 2. Pull third-party CSS into a layer */
@import url("vendor/datepicker.css") layer(vendor);

/* 3. Add to layers from anywhere; the order above doesn't change */
@layer components {
  #app .btn.primary { background: #2563eb; }
}
@layer utilities {
  .bg-none { background: none; }   /* wins over the rule above */
}
That @import must come before other rules, except @charset and @layer statements, so it sits right after the order line.
Two rules catch everyone the first time:
- Unlayered styles beat layered ones. MDN's cascade layers guide says normal unlayered declarations win "even if the unlayered styles have a lower specificity and come first in the order of appearance." In Chrome 152, a plain
.btnoutside any layer beat#t7 .btn.primaryinsidecomponents. !importantreverses the order. For important declarations, the first-declared layer wins and unlayered styles lose. A!importantinresetbeat a!importantincomponentsin the same test page.
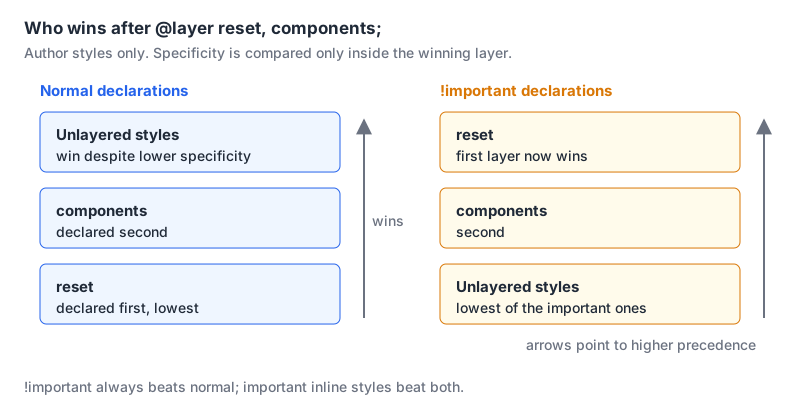
That reversal is deliberate: it lets a low layer like reset mark something as non-negotiable. It also means a stray !important in old unlayered code loses to any !important inside a layer, which is the opposite of what people expect.
How Tailwind v4 uses layers
If you use Tailwind, you already depend on this. The Preflight docs show what @import "tailwindcss" breaks down into:
@layer theme, base, components, utilities;
@import "tailwindcss/theme.css" layer(theme);
@import "tailwindcss/preflight.css" layer(base);
@import "tailwindcss/utilities.css" layer(utilities);
That's why a utility class can override a .card you defined in @layer components, as the custom styles docs show with class="card rounded-none". It also explains a common v4 surprise: any CSS you write outside a layer beats every utility, because unlayered wins. Put your own component CSS in @layer components. Our Tailwind v4 setup guide covers the install side, and if you're still choosing a framework, the Tailwind vs Bootstrap comparison is the place to start.
Migrating from Sass, in order
- Add the layer order line first. One
@layer reset, vendor, components, utilities;at the top of your entry file changes nothing until rules go into layers, so it's a safe first commit. - Move third-party CSS into
vendorwith@import ... layer(vendor). Your own unlayered code now beats it without specificity hacks. Delete the overrides that only existed to outrank the vendor file. - Search for
&-and&_in your.scssfiles. Every hit is a concatenated class name. Write the full class (.card__title) as its own top-level rule. That's more typing, and it also makes the class greppable again. - Check nested rules under selector lists. Any parent like
#header, .navnow lends ID weight to every child. Split those rules or wrap the heavy part in:where(). - Rename the file and let the browser do the work. Plain
.csswith nesting needs no build step, though you can keep Sass for mixins and functions. - Audit
!important. Inside layers it flips. Grep for it and decide case by case.
Two tools help with the grunt work. Our CSS to SCSS converter goes the other direction, nesting flat CSS for you; be aware that for BEM names it writes &__element suffixes, which only Sass understands. For reading the result, the CSS formatter beautify mode indents nested rules and nested @media blocks correctly in my test.
A quick checklist
- Order line declared once, before any
@importthat useslayer(). - No
&__or&-left in files the browser reads directly. - Own declarations before nested rules in every block.
- Nothing important left unlayered by accident: unlayered normal styles beat all layers.
- Old
!importantreviewed now that layers reverse it. - Your browser targets are at least Chrome 120, Firefox 117 and Safari 17.2 for type-selector nesting, or you prefix those rules with
&.
For the theming side, our post on custom properties and light-dark() builds on the same layer setup.
Written by AIDToolStack Editorial
Researched from official documentation, specifications and vendor pages, listed under Sources below. Last checked November 2026.
Sources
- drafts.csswg.org/css-nesting-1/
- developer.mozilla.org/en-US/docs/Web/CSS/Guides/Nesting/Using
- developer.mozilla.org/en-US/docs/Web/CSS/Reference/Selectors/Nesting_selector
- github.com/mdn/browser-compat-data/blob/main/css/selectors/nesting.json
- github.com/mdn/browser-compat-data/blob/main/api/CSSNestedDeclarations.json
- github.com/mdn/browser-compat-data/blob/main/css/at-rules/layer.json
- developer.mozilla.org/en-US/docs/Web/CSS/Reference/At-rules/@layer
- developer.mozilla.org/en-US/docs/Learn_web_development/Core/Styling_basics/Cascade_layers
- sass-lang.com/documentation/style-rules/parent-selector/
- sass-lang.com/documentation/style-rules/
- sass-lang.com/documentation/breaking-changes/mixed-decls/
- tailwindcss.com/docs/preflight
- tailwindcss.com/docs/adding-custom-styles
Related Posts
Explore on AIDToolStack
Discover tools and servers featured in our directory.
AI Tools
MCP Servers
Sponsor Our Newsletter
Reach thousands of developers who are actively evaluating AI tools, MCP servers, and dev infrastructure. Our weekly newsletter goes to engaged technical decision-makers.
All sponsored content is clearly labeled per our editorial policy.