
Self-Hosting Apps with Coolify: Install, Deploy Flow, Databases and Backups
Running your own server is cheap until you count the evenings. The VPS costs a few euros, but then you need a reverse proxy, certificates, a way to deploy on push, a database that gets backed up somewhere other than the same disk, and a place to see logs when it breaks at 11pm. If you've done it by hand with Docker Compose and Caddy (we wrote that version up in Deploying Next.js to Hetzner with Docker Compose), you know every piece is easy and the sum is not.
Coolify is an open-source, self-hostable platform that bundles those pieces behind a web UI: you connect a Git repository, it builds and runs containers on your servers, puts a proxy in front, and schedules database backups. This site runs on Coolify. Everything below comes from Coolify's own documentation, repository and release notes as of November 2026, not from how we've configured our instance.
What you're actually installing
Coolify is a control plane. It runs as a set of containers on one server and manages that server plus any number of others over SSH. Each managed server gets a proxy container (coolify-proxy) that receives public traffic and routes it to your apps.
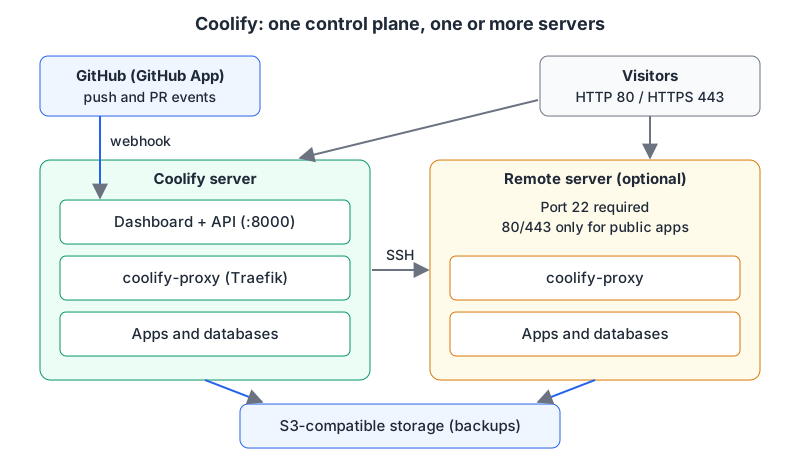
A few facts worth knowing before you start:
- The proxy. Coolify supports Traefik, Caddy, or no proxy at all. Traefik is the default. "None" means you handle routing and TLS yourself.
- Remote servers. The firewall docs say a remote server only needs port 22 open for Coolify to manage it; ports 80 and 443 only matter if it serves public web traffic.
- The version. The current release is v4.6.0, published on 2 November 2026. The v4 line is what you install today; I found no v5 release on the releases page.
Server requirements
From the installation docs:
| Requirement | Minimum |
|---|---|
| CPU | 2 cores |
| Memory | 2 GB RAM |
| Disk | 10 GB free |
| Architecture | amd64 or arm64 |
| OS | Linux (Debian/Ubuntu LTS, RHEL family, SUSE, Arch, Alpine, 64-bit Raspberry Pi OS) |
| Access | SSH as root or a sudo user |
The docs say Coolify can squeeze onto 1 core, 512 MB and 4 GB of disk but don't recommend it. Remember those minimums are for Coolify itself. Your apps, their builds and your databases come on top, and builds are the hungry part. If you build on the same box you serve from, size for the build.
Two other notes from the same page: start from a fresh server if you can, and if Docker was installed through snap, remove it and install Docker Engine the official way first. The v4.6.0 release notes add that Coolify now needs Docker Engine 24.0 or later because image layers use zstd compression.
Install, then lock the door
The automated install is one line:
curl -fsSL https://cdn.coollabs.io/coolify/install.sh | bashAccording to the docs, the script installs curl, wget, git, jq and openssl, installs and configures Docker Engine, creates directories under /data/coolify, sets up the SSH keys Coolify uses to manage the server, and starts Coolify. Piping a script into bash is a trust decision, so read it first if your policy requires that. The docs also describe a manual install with Docker Compose if you'd rather see each step.
When it finishes, the dashboard is on port 8000. Two things to do immediately:
- Register the admin account right away. The installation page warns that whoever reaches the registration page first becomes the instance admin, and that admin has root on your server. Don't leave a fresh install sitting there over lunch.
- Back up
/data/coolify/source/.env. It holds secrets such asAPP_KEYthat you need to restore Coolify from a backup. Put a copy in your password manager, not just on the same disk.
Then sort out the firewall. The firewall page lists what the Coolify server uses:
| Port | Used for | Can close later? |
|---|---|---|
| 22 | SSH | No (or your custom SSH port) |
| 80 | HTTP and certificate generation via the proxy | No |
| 443 | HTTPS via the proxy | No |
| 8000 | Dashboard by IP | Yes, once the dashboard has a domain |
| 6001 | Real-time updates by IP | Yes |
| 6002 | Web terminal by IP | Yes |
Give the dashboard a domain, confirm it loads over HTTPS, then close 8000, 6001 and 6002. If you're on a cloud provider, do it in the provider's firewall as well as on the host. Docker's own docs warn that with ufw, packets to published ports are routed before the firewall rules apply, "effectively ignoring your firewall configuration". While you're there, check the certificate on the new domain with our SSL checker.
Getting code onto it
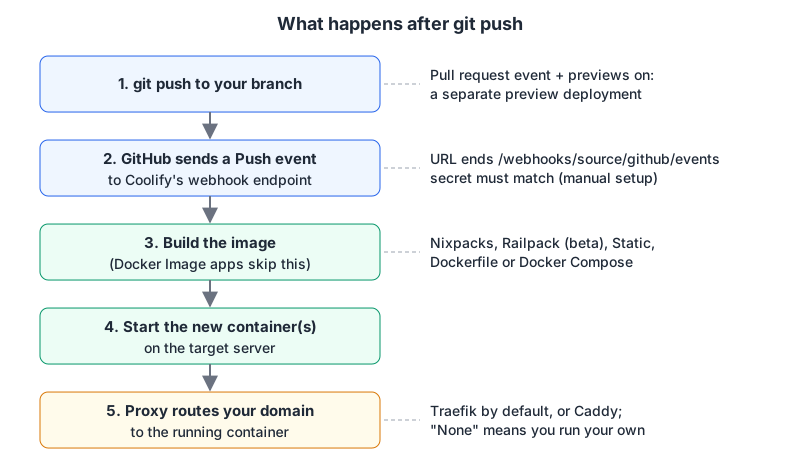
For GitHub, the docs recommend a GitHub App over deploy keys. The app can be scoped to one repository, a selection or all of them, and it subscribes to Push events so a push triggers a deploy. With the Pull request event and "Read and update pull requests" permission, you also get preview deployments per PR. Deploy keys are the fallback when you can't install an app or want read-only access to a single repo.
If you set the app up manually (GitHub Enterprise, say), the webhook URL ends in /webhooks/source/github/events and the secret has to match the one in Coolify. The docs are blunt about the failure mode: if GitHub can't reach that endpoint, automatic and preview deployments fail. Webhooks are a classic place for silent breakage, so it's worth checking the delivery log on GitHub's side after the first push.
Build packs
The build pack overview lists five ways to turn a repository into something runnable, plus one that skips building:
- Nixpacks: detects your language and framework and builds an image. Tweak it with
nixpacks.toml. - Railpack (beta): Railway's newer detector, configured with
railpack.json. - Static: serves a directory of finished files.
- Dockerfile: builds from the Dockerfile in your repo.
- Docker Compose: deploys a multi-service definition.
- Docker Image: not a build pack at all; it pulls an existing image from a registry.
My take: if you already have a Dockerfile, use it. Auto-detection is great for a first deploy, but a Dockerfile is the thing you can also run on your laptop, in CI and on any other host, so you're not tied to one platform's guesses. Our post on containerizing Next.js with Docker walks through a standalone, multi-stage one. The Docker Image route is the one to grow into: build in CI, push to a registry, and let Coolify only pull and run. That keeps heavy builds off the server that's serving traffic.
Databases and backups
Coolify can run databases as resources next to your apps, and its backup docs are specific about what's covered:
- Scheduled backups: PostgreSQL, MySQL, MariaDB, MongoDB, ClickHouse and SQLite.
- Not covered: Redis, Dragonfly and KeyDB. Those need their own persistence settings or tools.
- Schedules take a five-field cron expression or a name like
dailyorhourly. Our cron parser helps if you want "every day at 03:30" and not "every minute of hour three". - Local copies land in
/data/coolify/backups. Retention has three independent limits (number of backups, days, total GB), and0means unlimited. - S3-compatible storage can be added as one or more destinations, each with its own retention. You can delete the local copy after upload, but Coolify only does that once every selected destination has succeeded.
- A backup only runs while the database is running, and the default job timeout is 3,600 seconds.
The last line of that page is the one to frame: a successful backup only proves a file was written. The docs tell you to restore into a disposable database and check it. Do that once now and again after major upgrades. Our post on database backup strategies covers what a real restore test looks like with pg_dump and point-in-time recovery.
One more thing on backups: Coolify backing up your databases doesn't back up Coolify. That's what the .env copy is for, along with whatever snapshot your provider offers for the server itself.
What changed in v4.6.0
If you're upgrading rather than installing, the v4.6.0 release notes include a few things that can bite:
- Docker 24.0+ required, as above.
- API tokens need a new
deleteability (orroot) to delete resources through the API or MCP server. A token with onlywritecan't delete any more. If you drive Coolify from scripts or from an AI agent, whether through the built-in MCP server or a community one like the Coolify MCP server we list, check your token's abilities. - Windows with Docker Desktop is no longer supported.
- Some image tags were removed (
next,sha-<commit>, and release-candidate tags), and the upgrade script dropsCOOLIFY_VERSIONfrom.envbecause the version now comes from the image.
The same release adds per-project access control for team members and tokens, update channels (stable, preview, nightly or a custom image), and new API and MCP tools for DNS records, including Cloudflare.
Coolify Cloud, or host the control plane yourself?
Self-hosted Coolify is free, with all features. Coolify Cloud is the same dashboard hosted for you: as of November 2026 it's $5 a month including two connected servers, then $3 a month per extra server, with 20% off for annual billing. You still bring your own servers; Cloud only runs the control plane.
The trade is simple. Self-hosting the control plane costs nothing but puts Coolify on one of your boxes, which then has to be patched, backed up and kept reachable. With Cloud, your servers only need SSH open to Coolify, and the thing that deploys your apps isn't on the same machine that might be down. For a single hobby server I'd self-host. Once you have two or three production servers, $5 to $8 a month to move the control plane off them is cheap insurance.
If you want to compare this approach with managed platforms first, Serverless vs containers lays out where a single VPS stops making sense.
Before you point real traffic at it
- Server meets 2 cores / 2 GB / 10 GB, plus headroom for your builds
- Docker Engine 24.0 or newer, not the snap package
- Admin account registered immediately after install
/data/coolify/source/.envcopied somewhere off the server- Dashboard on a domain; ports 8000, 6001 and 6002 closed
- GitHub App scoped to only the repos it needs; first webhook delivery checked
- Every database on a backup schedule with an S3 destination
- One restore tested into a throwaway database
- API tokens reviewed for the v4.6.0
deleteability change
Written by AIDToolStack Editorial
Researched from official documentation, specifications and vendor pages, listed under Sources below. Last checked November 2026.
Sources
- coolify.io/docs/knowledge-base/server/proxies
- coolify.io/docs/knowledge-base/server/firewall
- github.com/coollabsio/coolify/releases/tag/v4.6.0
- github.com/coollabsio/coolify/releases
- coolify.io/docs/get-started/installation
- docs.docker.com/engine/network/packet-filtering-firewalls/
- coolify.io/docs/applications/ci-cd/github/setup-app
- coolify.io/docs/applications/build-packs/overview
- coolify.io/docs/databases/backups
- coolify.io/pricing
Related Posts
Explore on AIDToolStack
Discover tools and servers featured in our directory.
AI Tools
MCP Servers
Sponsor Our Newsletter
Reach thousands of developers who are actively evaluating AI tools, MCP servers, and dev infrastructure. Our weekly newsletter goes to engaged technical decision-makers.
All sponsored content is clearly labeled per our editorial policy.