
Cloudflare Tunnel for Local Development: Quick Tunnels, Named Tunnels and ngrok
Sooner or later localhost isn't enough. Stripe wants to POST a webhook to your dev server. A designer wants to click through the branch on their phone. An OAuth provider insists on a public HTTPS callback URL. Your laptop sits behind NAT on café Wi-Fi, and opening a port on the router isn't an option even if you wanted to.
A tunnel solves this by turning the connection around. Instead of the internet connecting in to you, a small agent on your machine connects out to a provider's edge, and the provider sends requests back down that connection. Cloudflare Tunnel (the cloudflared daemon) and ngrok are the two you'll meet most. This post covers how Cloudflare's version works, its quick and named modes and their limits, how to keep it from being an open door, and how it compares with ngrok as of November 2026.
How it works
From the Cloudflare Tunnel docs: cloudflared opens outbound connections from your machine to Cloudflare, so your origin needs no public IP and no inbound listener. You can configure the firewall to allow only outbound traffic. Each cloudflared instance opens four outbound connections to four different servers across at least two data centers, which is why a single flaky edge server doesn't drop your tunnel.
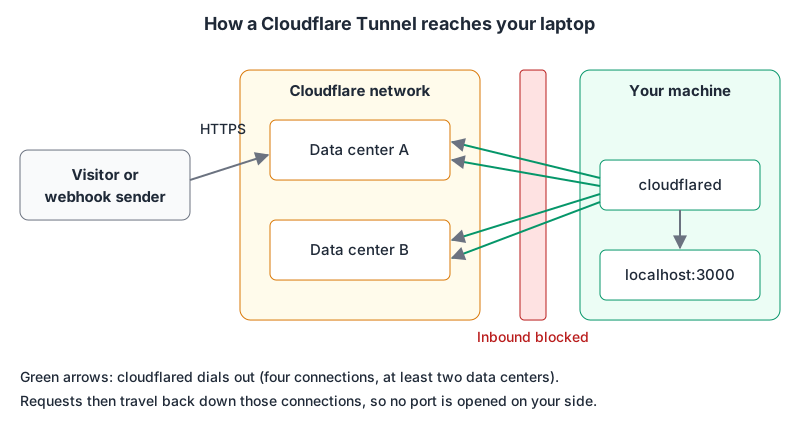
The current cloudflared release is 2026.10.7, published 30 October 2026. On macOS it's brew install cloudflared; the local tunnel guide lists the other platforms.
Quick tunnels: one command, no account
For a throwaway URL:
cloudflared tunnel --url http://localhost:8080That prints a random trycloudflare.com hostname and starts proxying. Per the Quick Tunnels page, you don't need a Cloudflare account or a domain. It's the fastest way to show someone a local build.
The limits matter, though:
- 200 in-flight requests per tunnel. Anything beyond that gets a
429. - No Server-Sent Events. If your app streams responses with SSE, test it some other way.
- No uptime guarantee.
- A new hostname every time. Restart the tunnel and every webhook registration you made points at nothing.
That last one is the real annoyance for webhook work. You'll update the Stripe dashboard's endpoint URL more times than you want to.
Named tunnels: a stable hostname on your own domain
A named tunnel gets a persistent ID and lives on a hostname you control. The prerequisite is a domain on Cloudflare (its nameservers pointed at Cloudflare). The locally managed flow looks like this:
- Log in. This opens a browser and saves an account certificate,
cert.pem, in the defaultcloudflareddirectory.
cloudflared tunnel login- Create the tunnel. It gets a UUID and a credentials JSON file.
   cloudflared tunnel create dev-laptop
cloudflared tunnel list- Write
~/.cloudflared/config.yml. With more than one service you use ingress rules, and the configuration file docs require a catch-all as the last rule:
   tunnel: <Tunnel-UUID>
   credentials-file: /Users/you/.cloudflared/<Tunnel-UUID>.json

   ingress:
     - hostname: dev.example.com
       service: http://localhost:3000
     - hostname: hooks.example.com
       service: http://localhost:4242
- service: http_status:404- Check the rules before you rely on them.
validatechecks the file;ruletells you which rule a URL hits.
   cloudflared tunnel ingress validate
cloudflared tunnel ingress rule https://hooks.example.com/stripe- Create the DNS records. Each becomes a CNAME to
<UUID>.cfargotunnel.com.
   cloudflared tunnel route dns dev-laptop dev.example.com
cloudflared tunnel route dns dev-laptop hooks.example.com- Run it.
cloudflared tunnel run dev-laptopNow hooks.example.com survives restarts, laptop sleeps and new Wi-Fi networks. Register it once with your webhook provider and forget about it. Our webhook tester and webhook payload builder are handy for poking the endpoint before the real provider does, and the Stripe integration patterns post covers verifying signatures on whatever arrives.
The credentials-file is a secret. Anyone holding it can run your tunnel, so keep it out of the repo and out of dotfile backups you publish.
Or manage it from the dashboard
Cloudflare also supports remotely managed tunnels. In the dashboard you go to Networking > Tunnels, create a tunnel, copy the install command for your OS, and run it on the machine that hosts the app. Routes are then added as Published application entries with a subdomain, a domain, an optional path and a service URL such as http://localhost:8000. Two details from that page: the path isn't stripped (your app receives the full request path), and multi-level subdomains like a.b.example.com need an Advanced Certificate.
For a team, I'd use the dashboard: config lives in one place and nobody has to share a credentials file. For a personal dev tunnel, the local config file is easier to version in your head.
Don't publish your dev server to the whole internet
A named tunnel makes dev.example.com reachable by anyone who guesses it. Your dev server probably has debug pages, seeded admin users and no rate limiting. The remote tunnel docs point to the fix: put an Access application in front of the hostname so visitors authenticate before Cloudflare forwards anything. This is why the example config puts the webhook receiver on its own hooks. hostname: protect dev. with Access, leave hooks. reachable by the provider, and make that receiver verify signatures and ignore everything else.
Tunnels can also carry SSH: the configuration docs show an ingress rule with service: ssh://localhost:22. Handy, but it's the same rule: don't publish it without Access in front. And if what you really want is private access between your own machines rather than a public URL, a mesh VPN is the better fit; see the Tailscale MCP server page for how agents can manage one.
Cloudflare Tunnel vs ngrok
ngrok is the tool most people learned this with, and its CLI is still the quickest to explain. From the ngrok CLI reference:
ngrok config add-authtoken <TOKEN>
ngrok http 8080
ngrok http 8080 --url https://your-name.ngrok.dev
Note that --domain is deprecated in favour of --url, so older blog posts and READMEs will show the old flag. ngrok's Traffic Inspector shows requests and responses in real time and lets you replay them, which is a genuinely nice webhook debugging loop: trigger once, replay as many times as you need while you fix the handler.
As of November 2026, from ngrok's pricing page and Cloudflare's docs:
| Cloudflare quick tunnel | Cloudflare named tunnel | ngrok Free | ngrok Hobbyist | |
|---|---|---|---|---|
| Account needed | No | Yes, plus a domain on Cloudflare | Yes | Yes |
| Hostname | Random, changes each run | Your own domain | 1 assigned dev domain | Dev domain plus 10 ngrok-branded domains |
| Usage limits | 200 in-flight requests, no SSE | Account limits (below) | 3 endpoints, 1 GB transfer, 20k requests/month | 5 GB and 100k requests/month included, then metered |
| Price | No account, so no bill | Available on all plans | $0 | $10/month |
ngrok's Pay-as-you-go plan is $20 a month with usage credit and is where custom domains appear, billed at $0.01 per active hour. On Cloudflare's side, the account limits page caps an account at 1,000 tunnels and 25 active replicas per tunnel, numbers you won't hit for dev work.
One more ngrok detail: the pricing page lists an interstitial page on the Free plan only, so a client clicking your demo link on Free sees an ngrok page before your app.
Which one I'd use
- Showing a local build to someone for ten minutes: a Cloudflare quick tunnel. No signup, gone when you hit Ctrl-C. Skip it if your app uses SSE.
- Receiving webhooks during development: if you already have a domain on Cloudflare, a named tunnel with a dedicated
hooks.hostname and Access on everything else. If you don't, ngrok's free dev domain plus its request replay is the shorter path. - A team-shared dev or preview environment: a dashboard-managed Cloudflare tunnel with Access, so the config and the access policy live in one place. Our Cloudflare MCP server page lists what agents can manage on the Cloudflare side if you automate this.
Whichever you pick, treat the tunnel URL as public. Rotate credentials if a config file leaks, and stop tunnels you aren't using.
Written by AIDToolStack Editorial
Researched from official documentation, specifications and vendor pages, listed under Sources below. Last checked November 2026.
Sources
- developers.cloudflare.com/cloudflare-one/networks/connectors/cloudflare-tunnel/
- developers.cloudflare.com/cloudflare-one/networks/connectors/cloudflare-tunnel/configure-tunnels/tunnel-availability/
- github.com/cloudflare/cloudflared/releases
- developers.cloudflare.com/cloudflare-one/networks/connectors/cloudflare-tunnel/do-more-with-tunnels/local-management/create-local-tunnel/
- developers.cloudflare.com/cloudflare-one/networks/connectors/cloudflare-tunnel/do-more-with-tunnels/trycloudflare/
- developers.cloudflare.com/cloudflare-one/networks/connectors/cloudflare-tunnel/do-more-with-tunnels/local-management/configuration-file/
- developers.cloudflare.com/cloudflare-one/networks/connectors/cloudflare-tunnel/get-started/create-remote-tunnel/
- ngrok.com/docs/agent/cli
- ngrok.com/docs/share-localhost/overview
- ngrok.com/pricing
- developers.cloudflare.com/tunnel/
- developers.cloudflare.com/cloudflare-one/account-limits/
Related Posts
Explore on AIDToolStack
Discover tools and servers featured in our directory.
AI Tools
MCP Servers
Sponsor Our Newsletter
Reach thousands of developers who are actively evaluating AI tools, MCP servers, and dev infrastructure. Our weekly newsletter goes to engaged technical decision-makers.
All sponsored content is clearly labeled per our editorial policy.